Introducción
Buenas, en este post configuraremos un escenario en vagrant con 3 máquinas (un servidor iSCSI Debian, un cliente Debian y un cliente Windows). Haremos los siguientes pasos en el escenario anterior:
- Crearemos un target con una LUN y lo conectaremos al cliente GNU/Linux.
- Utilizaremos systemd mount para que el target se monte automáticamente al arrancar el cliente.
- Crearemos un target con 2 LUN y autenticación por CHAP y lo conectaremos a un cliente windows.
Escenario
Tenemos el siguiente escenario creado en VirtualBox mediante vagrant:
# -*- mode: ruby -*-
# vi: set ft=ruby :

Vagrant.configure("2") do |config|

        config.vm.define :server do |server|
                disco1 = '.vagrant/disco1.vdi'
                disco2 = '.vagrant/disco2.vdi'
                disco3 = '.vagrant/disco3.vdi'
                disco4 = '.vagrant/disco4.vdi'
                server.vm.box = "debian/buster64"
                server.vm.hostname = "server"
                server.vm.network "public_network",:bridge=>"wlp5s0"
                server.vm.network "private_network", ip: "192.168.100.1",
                        virtualbox__intnet: "intranet"
                server.vm.provider :virtualbox do |v|
                        if not File.exist?(disco1)
                                v.customize ["createhd", "--filename", disco1, "--size", 1024]
                                v.customize ["storageattach", :id, "--storagectl", "SATA Controller", "--port", 1, "--device", 0, "--type", "hdd", "--medium", disco1]
                        end
                        if not File.exist?(disco2)
                                v.customize ["createhd", "--filename", disco2, "--size", 1024]
                                v.customize ["storageattach", :id, "--storagectl", "SATA Controller", "--port", 2, "--device", 0, "--type", "hdd", "--medium", disco2]
                        end
                        if not File.exist?(disco3)
                                v.customize ["createhd", "--filename", disco3, "--size", 1024]
                                v.customize ["storageattach", :id, "--storagectl", "SATA Controller", "--port", 3, "--device", 0, "--type", "hdd", "--medium", disco3]
                        end
                        if not File.exist?(disco4)
                                v.customize ["createhd", "--filename", disco4, "--size", 1024]
                                v.customize ["storageattach", :id, "--storagectl", "SATA Controller", "--port", 4, "--device", 0, "--type", "hdd", "--medium", disco4]
                        end
                end
        end

        config.vm.define :debian do |debian|
                debian.vm.box = "debian/buster64"
                debian.vm.hostname = "cliente"
                debian.vm.network "public_network",:bridge=>"wlp5s0"
                debian.vm.network "private_network", ip:"192.168.100.2",
                        virtualbox__intnet: "intranet"
        end

end
También tenemos una máquina Windows conectada a virtualbox en la misma red.
Instalación tgt servidor
Para poder hacer uso de iSCSI vamos a usar la herramienta tgt, para instalarla en el servidor:
sudo apt install tgt
Creación de target para debian
Para crear el target de forma permanente y no desaparezca cuando reiniciemos el servidor, vamos a irnos a:
sudo nano /etc/tgt/conf.d/target1.conf
Crearemos un archivo .conf para cada target que queramos realizar. En el anterior lo vamos a realizar de un sólo LUN, es decir, de un sólo disco, así que para ello añadimos:
<target iqn.2021-01-target1>
    backing-store /dev/sdb
</target>
Reiniciamos el servicio:
sudo systemctl restart tgt
Y podremos consultar la información del target de la siguiente forma:
sudo tgtadm --mode target --op show

Target 1: iqn.2021-01-target1
    System information:
        Driver: iscsi
        State: ready
    I_T nexus information:
    LUN information:
        LUN: 0
            Type: controller
            SCSI ID: IET     00010000
            SCSI SN: beaf10
            Size: 0 MB, Block size: 1
            Online: Yes
            Removable media: No
            Prevent removal: No
            Readonly: No
            SWP: No
            Thin-provisioning: No
            Backing store type: null
            Backing store path: None
            Backing store flags:
        LUN: 1
            Type: disk
            SCSI ID: IET     00010001
            SCSI SN: beaf11
            Size: 1074 MB, Block size: 512
            Online: Yes
            Removable media: No
            Prevent removal: No
            Readonly: No
            SWP: No
            Thin-provisioning: No
            Backing store type: rdwr
            Backing store path: /dev/sdb
            Backing store flags:
    Account information:
    ACL information:
        ALL
En nuestro caso este target ya está disponible para todas las interfaces de red, en el caso de que no estuviera:
sudo tgtadm --lld iscsi --op bind --mode target --tid 1 -I ALL
Cliente debian
Instalamos el paquete necesario para que se pueda hacer la búsqueda de targets en el cliente, el paquete lo que hace es generar un nombre para el initiator(cliente iSCSI) para que pueda ser identificado por el servidor:
sudo apt install open-iscsi
Podemos ver la información de los targets disponibles en el servidor:
sudo iscsiadm --mode discovery --type sendtargets --portal 192.168.100.1
Para conectarnos a dicho target:
sudo iscsiadm --mode node -T iqn.2021-01-target1 --portal 192.168.100.1 -l
Y podemos comprobar tanto con journalctl:
sudo journalctl -k -f
-- Logs begin at Tue 2021-02-09 11:59:02 GMT. --
Feb 09 12:38:07 cliente kernel: scsi 1:0:0:0: RAID              IET      Controller       0001 PQ: 0 ANSI: 5
Feb 09 12:38:07 cliente kernel: scsi 1:0:0:0: Attached scsi generic sg1 type 12
Feb 09 12:38:07 cliente kernel: scsi 1:0:0:1: Direct-Access     IET      VIRTUAL-DISK     0001 PQ: 0 ANSI: 5
Feb 09 12:38:07 cliente kernel: sd 1:0:0:1: Attached scsi generic sg2 type 0
Feb 09 12:38:07 cliente kernel: sd 1:0:0:1: Power-on or device reset occurred
Feb 09 12:38:07 cliente kernel: sd 1:0:0:1: [sdb] 2097152 512-byte logical blocks: (1.07 GB/1.00 GiB)
Feb 09 12:38:07 cliente kernel: sd 1:0:0:1: [sdb] Write Protect is off
Feb 09 12:38:07 cliente kernel: sd 1:0:0:1: [sdb] Mode Sense: 69 00 10 08
Feb 09 12:38:07 cliente kernel: sd 1:0:0:1: [sdb] Write cache: enabled, read cache: enabled, supports DPO and FUA
Feb 09 12:38:07 cliente kernel: sd 1:0:0:1: [sdb] Attached SCSI disk
Y con lsblk:
lsblk
NAME   MAJ:MIN RM  SIZE RO TYPE MOUNTPOINT
sda      8:0    0 19.8G  0 disk
├─sda1   8:1    0 18.8G  0 part /
├─sda2   8:2    0    1K  0 part
└─sda5   8:5    0 1021M  0 part [SWAP]
sdb      8:16   0    1G  0 disk
Que nuestro cliente se ha conectado correctamente.
Podemos cerrar la sesión con el target de la siguiente forma:
sudo iscsiadm --mode node -T iqn.2021-01-target1 --portal 192.168.100.1 -u
Formateo y uso del target
El nuevo dispositivo podemos usarlo como si del propio equipo fuera, por ejemplo, para formatearlo:
sudo mkfs.ext4 /dev/sdb
mke2fs 1.44.5 (15-Dec-2018)
Creating filesystem with 262144 4k blocks and 65536 inodes
Filesystem UUID: 6d3dd1a4-e8dc-454b-bce5-324a7dbe67f6
Superblock backups stored on blocks:
	32768, 98304, 163840, 229376

Allocating group tables: done
Writing inode tables: done
Creating journal (8192 blocks): done
Writing superblocks and filesystem accounting information: done
lsblk -f
NAME   FSTYPE LABEL UUID                                 FSAVAIL FSUSE% MOUNTPOINT
sda
├─sda1 ext4         983742b1-65a8-49d1-a148-a3865ea09e24   16.2G     7% /
├─sda2
└─sda5 swap         04559374-06db-46f1-aa31-e7a4e6ec3286                [SWAP]
sdb    ext4         6d3dd1a4-e8dc-454b-bce5-324a7dbe67f6
Podemos montarlo si necesitamos escribir datos en el:
sudo mount -t ext4 /dev/sdb /mnt/
lsblk -f
NAME   FSTYPE LABEL UUID                                 FSAVAIL FSUSE% MOUNTPOINT
sda
├─sda1 ext4         983742b1-65a8-49d1-a148-a3865ea09e24   16.2G     7% /
├─sda2
└─sda5 swap         04559374-06db-46f1-aa31-e7a4e6ec3286                [SWAP]
sdb    ext4         6d3dd1a4-e8dc-454b-bce5-324a7dbe67f6  906.2M     0% /mnt
Y escribir en él:
sudo touch /mnt/fichero1
ls /mnt/
fichero1  lost+found
Automontar al inicio
Vamos a usar una unidad de systemd que se encargará de montar el target después de iniciarse open-iscsi.service. Para ello, primero vamos a cargar el target con la siguiente configuración no sin antes desmontarlo:
sudo iscsiadm --mode node -T iqn.2021-01-target1 --portal 192.168.100.1 -u
sudo iscsiadm --mode node -T iqn.2021-01-target1 -o update -n node.startup -v automatic
Después nos iremos al siguiente fichero:
sudo nano /etc/iscsi/iscsid.conf
Y cambiamos la siguiente línea de manual a automatic:
node.startup = automatic
Luego reiniciamos el servicio y vemos como se carga automáticamente:
sudo systemctl restart iscsi.service
lsblk
NAME   MAJ:MIN RM  SIZE RO TYPE MOUNTPOINT
sda      8:0    0 19.8G  0 disk
├─sda1   8:1    0 18.8G  0 part /
├─sda2   8:2    0    1K  0 part
└─sda5   8:5    0 1021M  0 part [SWAP]
sdb      8:16   0    1G  0 disk
Activamos también el servicio para que se ejecute al arranque:
sudo systemctl enable open-iscsi.service
Así que lo que haremos ahora será crear la unidad de systemd para que se monte automáticamente cuando inicie el sistema, para ello, primero crearemos la carpeta dónde se montarán las unidades iSCSI:
sudo mkdir /media/iSCSI
Ahora creamos la unidad systemd tipo mountteniendo en cuenta que el nombre que deben de tener tiene que ser igual que el del directorio donde se va a montar y el UUID que tenemos que poner es el del disco del target :
sudo nano /etc/systemd/system/media-iSCSI-target1.mount
[Unit]
Description=target1
After=open-iscsi.service

[Mount]
What=/dev/disk/by-uuid/6d3dd1a4-e8dc-454b-bce5-324a7dbe67f6
Where=/media/iSCSI/target1
Type=ext4
Options=defaults

[Install]
WantedBy=multi-user.target
Ya sólo nos falta reiniciar los demonios, habilitar la unidad e iniciarla:
sudo systemctl daemon-reload
sudo systemctl enable media-iSCSI-target1.mount
sudo systemctl start media-iSCSI-target1.mount
Y si comprobamos:
lsblk -f

NAME   FSTYPE LABEL UUID                                 FSAVAIL FSUSE% MOUNTPOINT
sda
├─sda1 ext4         983742b1-65a8-49d1-a148-a3865ea09e24   15.9G     9% /
├─sda2
└─sda5 swap         04559374-06db-46f1-aa31-e7a4e6ec3286                [SWAP]
sdb    ext4         6d3dd1a4-e8dc-454b-bce5-324a7dbe67f6  906.2M     0% /media/iSCSI/target1
Creación de target para windows
Exactamente igual que en la configuración para el target1, pero en otro fichero .conf:
sudo nano /etc/tgt/conf.d/target2.conf
Esta vez lo vamos a realizar de un dos LUN, es decir, de dos discos, y también con autentificación CHAP, así que para ello añadimos:
<target iqn.2021-01-target2>
    backing-store /dev/sdc
    backing-store /dev/sdd
    incominguser user password12345678
</target>
Reiniciamos el servicio:
sudo systemctl restart tgt
Y podremos consultar la información del target de la siguiente forma:
sudo tgtadm --mode target --op show

Target 2: iqn.2021-01-target2
    System information:
        Driver: iscsi
        State: ready
    I_T nexus information:
    LUN information:
        LUN: 0
            Type: controller
            SCSI ID: IET     00020000
            SCSI SN: beaf20
            Size: 0 MB, Block size: 1
            Online: Yes
            Removable media: No
            Prevent removal: No
            Readonly: No
            SWP: No
            Thin-provisioning: No
            Backing store type: null
            Backing store path: None
            Backing store flags:
        LUN: 1
            Type: disk
            SCSI ID: IET     00020001
            SCSI SN: beaf21
            Size: 1074 MB, Block size: 512
            Online: Yes
            Removable media: No
            Prevent removal: No
            Readonly: No
            SWP: No
            Thin-provisioning: No
            Backing store type: rdwr
            Backing store path: /dev/sdc
            Backing store flags:
        LUN: 2
            Type: disk
            SCSI ID: IET     00020002
            SCSI SN: beaf22
            Size: 1074 MB, Block size: 512
            Online: Yes
            Removable media: No
            Prevent removal: No
            Readonly: No
            SWP: No
            Thin-provisioning: No
            Backing store type: rdwr
            Backing store path: /dev/sdd
            Backing store flags:
    Account information:
        user
    ACL information:
        ALL
En nuestro caso este target ya está disponible para todas las interfaces de red, en el caso de que no estuviera:
sudo tgtadm --lld iscsi --op bind --mode target --tid 1 -I ALL
Cliente windows
Conexión a target
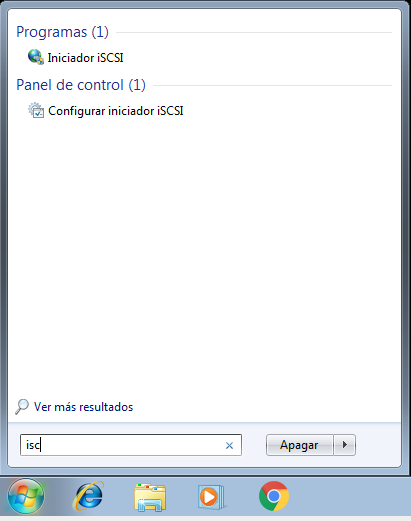
En el cliente windows nos vamos al botón inicio y escribimos para iniciar Iniciador iSCSI:
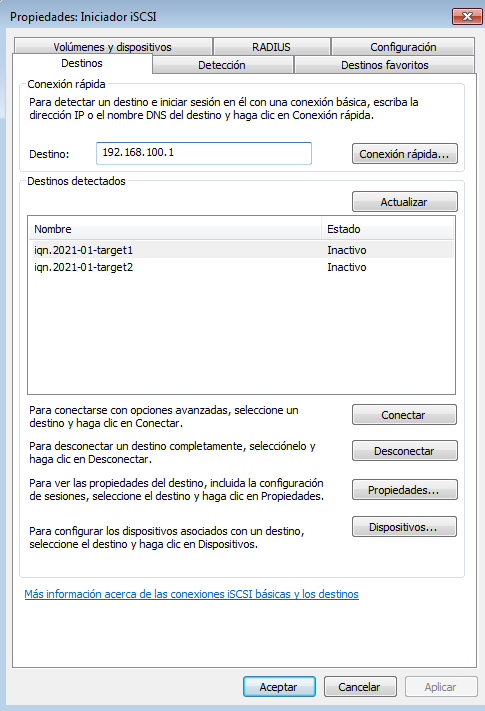
Introducimos la IP del servidor, actualizamos y pulsamos en el target elegido:
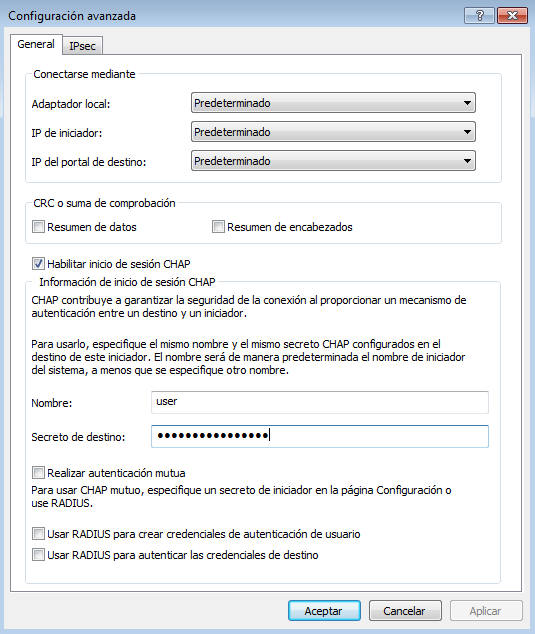
Nos vamos a opciones avanzadas para poder introducir el usuario y contraseña:

Habilitamos el inicio de sesión CHAP para poder introducir el usuario y contraseña:
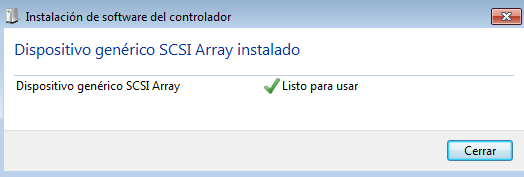
Aceptamos y vemos como se ha conectado el dispositivo:
Formateo y uso unidad iSCSI
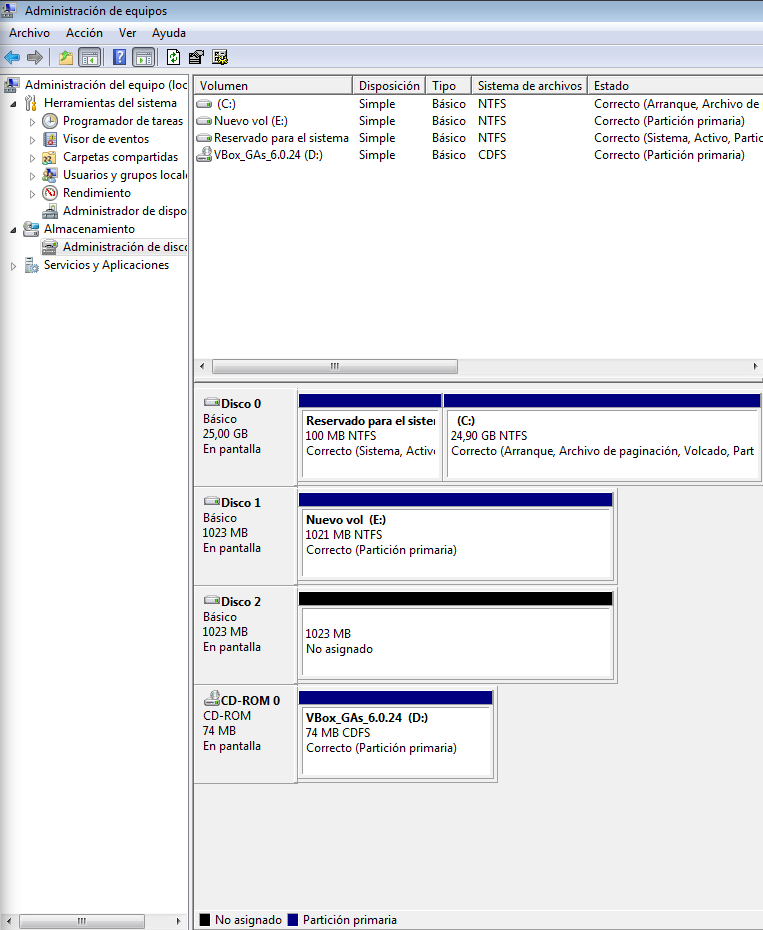
Para poder ver que ha funcionado correctamente nos vamos al gestor de discos en windows:
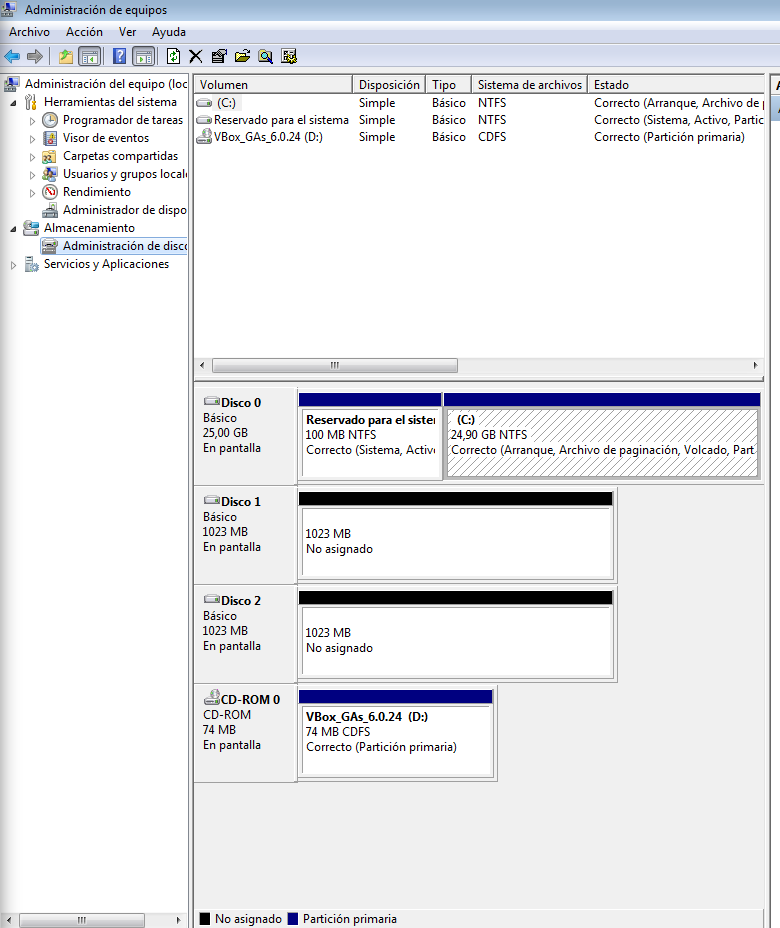
Y comprobamos que podemos formatear el disco perfectamente igual que pudiéramos trabajar en él: